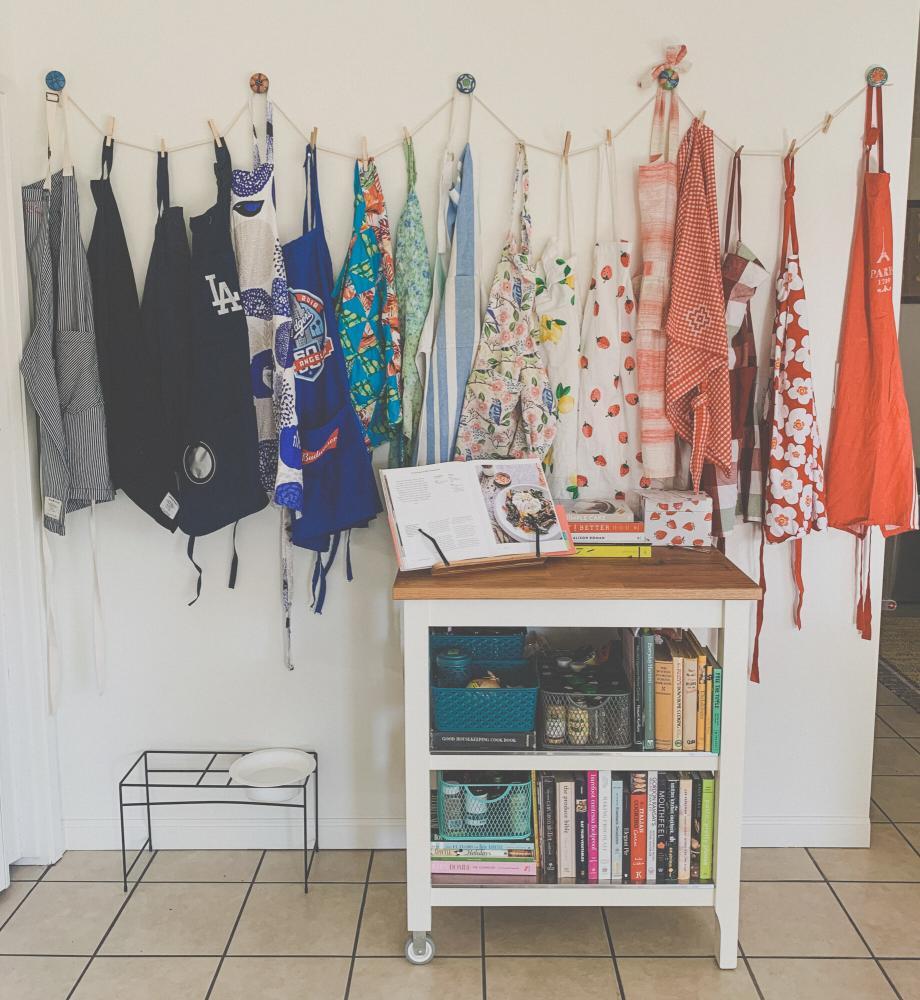
This gorgeous scarf organizer works for any type of long garment. My housemate used this template to create an apron wall display. The materials are easily accessible and building it is so much fun!
I can be obsessive about matching my clothes. After living in the cold and wet Northeast United States for 10 years, I gathered a decent collection of scarves, many of which were gifts. Scarves are one of my favorite accessories, along with dangly earrings and chunky jewelry.
When I moved into my first apartment post-divorce, my bedroom had a large wall that needed decorating. Meanwhile, my small Los Angeles closet barely had enough space for the rest of my clothes. At first, I kept my scarves in an organizer inside a bin under my bed.
But I soon realized that out of sight meant out of mind. I actually forgot about some of the scarves I owned.
I created this scarf wall idea to organize my accessories in a useful and practical way that also acts as a decorative display. I am currently on version 3.0, having tweaked and upgraded my design at each subsequent place I’ve lived. Recently I offered my extra materials to my roommate, who refurbished the scarf wall idea to organize her aprons!
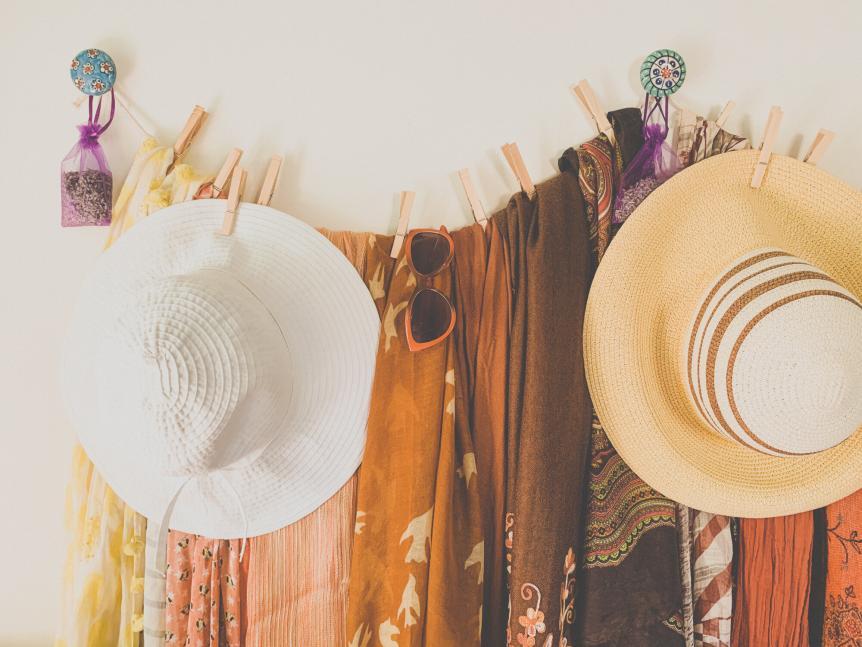
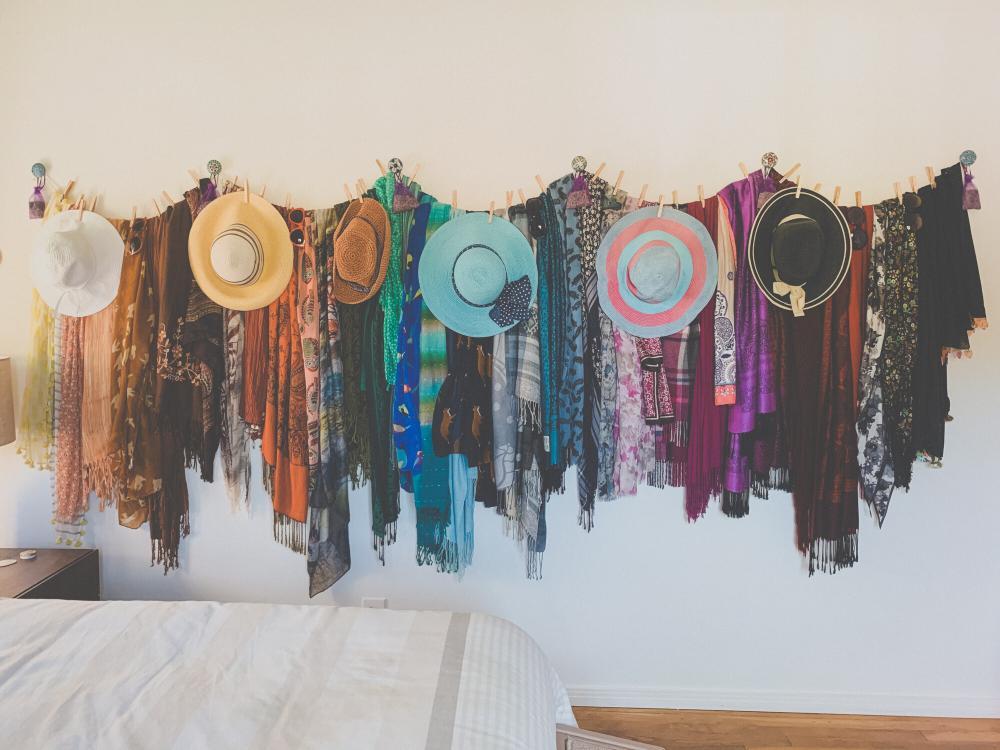
My current scarf wall display includes hats and sunglasses too. It even works for delicate scarves made of materials like silk, cashmere, or pashmina. An unexpected benefit is that the layer of scarves acts as an additional sound insulator between rooms and walls.
Once you’ve got the tools you need, creating your own scarf wall is easy. I’ve detailed the steps below. Let me know in the comments if you create your own!
As a disclaimer, this post includes affiliate links. I may receive a small commission if you buy products through this page. I only ever recommend products that I’d personally buy and use.
Materials You Need to Build Your DIY Scarf Wall Display

You can easily create this scarf wall display with materials that are readily available at most hardware, home goods, and arts and crafts stores.
- Anchors & screws – To keep your scarf wall safe from falling, you’ll drill, anchor, and screw it to the wall. (Aw, yeah.) This set of anchors and screws has come in handy for me over the years. You can use regular screws for each hanging point, or you can use decorative knobs or drawer pulls in their place. If hanging on drywall, you should use anchors to keep your screws from being ripped out of the wall. You can also drill directly into a stud without using an anchor.
- Drill, drill bits, and stud finder – You’ll need a stud finder to make sure you know what you’re drilling into – drywall or studs (wooden beams). With stud finders, you can choose cheap and simple or technologically advanced. Similarly, when it comes to drills, there are so many options for so many different preferences at different price points. This Black & Decker cordless drill is the one I own, but you can also go for a model like the Avid Power 20V Max. Just make sure your drill kit includes drill bits. You may need special hardware if drilling into other materials like exposed brick or concrete.
- Cotton clothesline and clothespins – A cotton clothesline is perfect for this setup. It’s soft and made to be used with garments. Meanwhile, without clothespins, your scarves will end up sliding down to the middle of your clothesline. I just grabbed a bag of assorted clothespins from my local crafts store but they’re easy enough to find. You can also choose a more colorful option for clothespins.
- Knobs or drawer pulls – I use these knobs for decoration instead of simply hanging the clothesline from plain screws. You can find so many options to personalize your setup.
- Tape measure and pencil – You can buy a tape measure on its own, but if you don’t have a home toolbox yet, I highly recommend you get one just to have around. I’ve had this home toolbox for nearly a decade and it’s served me well.
Just to be on the safe side, I like to keep a few moth traps on either side of my scarf wall.
Steps for Creating Your DIY Scarf Wall Display
Step 1: Measure and Mark
I like to hang the anchor points on my scarf display 6 feet high, between 1.5 to 2 feet apart. I’m 5’5” and this height is comfortable for my reach. My current scarf display has 6 anchor points and takes up most of an otherwise empty wall that’s 12 feet wide.
My roommate’s apron wall hangs at almost 7 feet high (6’10” to be exact) with 5 anchor points. We decided to go higher with this configuration because we knew the kitchen cart would stand underneath the aprons. (Plus, my roommate is 5” taller than me!)
Step 2: Drill, Anchor, and Screw!
Make sure you check for studs before drilling into your walls.
Here’s a quick refresher on the drilling and anchoring process if you need it.
After placing your anchors in the walls, screw in either the screws or your decorative knobs. Make sure to leave them slightly unscrewed at the end so you have room to tie the clothesline.
Step 3: Hang the Line
I recommend measuring and cutting your clothesline first to make sure you get an equidistant length between anchor points. You can see in the process video above that I didn’t take the time to complete this step and I had to go back over twice to get the lengths right.
Start with a double knot on the first anchor, then bring the line to the next anchor point. Tie a simple single knot around each screw or knob as you go – this will stabilize the line and help keep it from shifting between points. Finish at the end with another double knot.
Step 4: Decorate!
Now for the fun part: decorating with your scarves, hats, sunglasses, aprons – what have you! In my current setup, I have a small bushel of lavender hanging from each point, mostly because I heard spiders don’t like lavender and I don’t like spiders. (Apparently, moths don’t like lavender either!)
I’ve hung my scarves two different ways on this line:
- Clipping the clothespin to the line, folding each scarf in half and hanging it from the clothespin (what you see in scarf wall version 2.0), or
- Folding each scarf over the line and clipping it directly to the line (scarf wall version 3.0).
From personal experience, version 3.0 is the better option – both in terms of ease and care. In scarf wall 2.0, the clothespins hold the entire weight of the scarves so I had to pinch them well enough to stay in place. My heavier scarves would be harder to hold up and the pinching of the clothespin would damage my more delicate scarves. In the photos, you can see a dark blue scarf that I put through a bracelet before hanging the bracelet off the clothespin instead.
In version 3.0, the weight of each scarf goes on the line instead. The clothespins gently hold the scarves in place to keep them from sliding down. If you have delicate scarves that you don’t want to pin, you can simply fold them over the line and place them between other pinned scarves to keep them in place. When pinning the line with clothespins, make sure to align the clothesline with the round groove in the pin. That’ll help keep pinching to a minimum.
Most hats are easy enough to pin along the brim. Sunglasses you can simply fold over the line. With aprons, you can hang them from the neck tie or the chest.
I love having my accessories so visible and accessible. Plus, it makes for such an eye-catching display. If you create your own scarf or accessory wall with this method, I’d love to hear about it! Please leave a comment if you have any questions.